
One global “put likes everywhere” setting works until it doesn’t.
You might want like buttons below blog posts, but above WooCommerce products. Or BuddyPress activity might need engagement controls, while forum replies should stay clean. Your theme might also have a custom hook that works better than “before” or “after” content.
That’s the moment WP ULike Display Automation earns its keep.
Not because the regular automatic display is bad. For most sites, it’s perfect. But this is the extra control layer for people who mix blogs, shops, communities, and forums on one WordPress site and don’t want to edit theme files to make it all feel right.
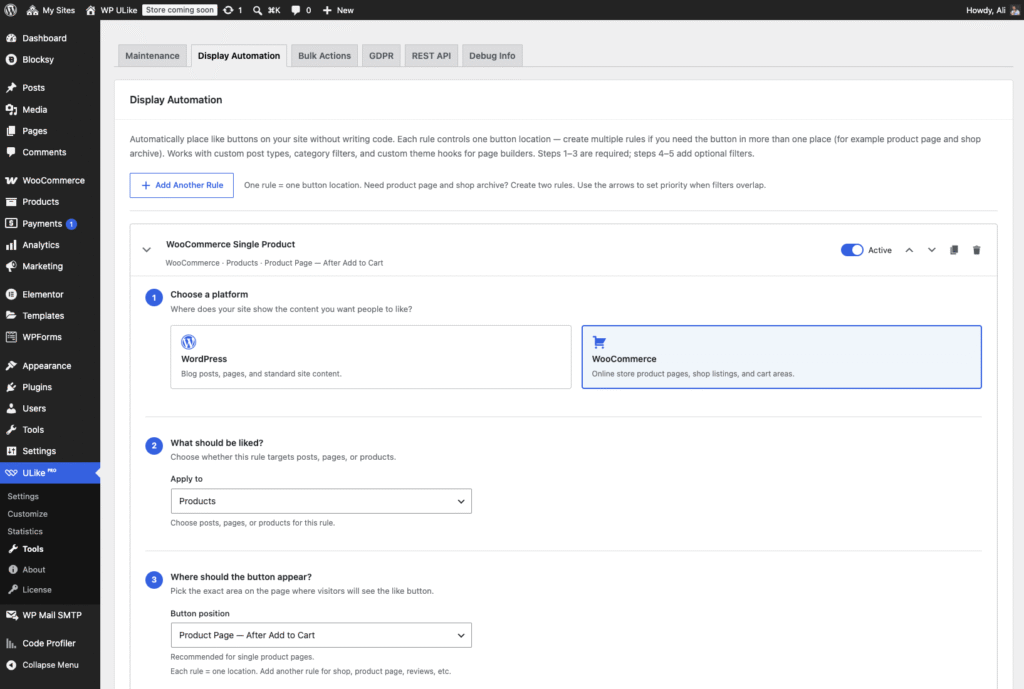
Inside WP ULike Pro → Tools → Display Automation, you get a visual rule builder for like button placement. So you keep the same WP ULike engine and the same buttons your visitors already know. You’re just deciding where they show up, rule by rule.
What Display Automation actually does
Think of it as smart paths for your like buttons.
Each rule controls one button location. Need likes on both the product page and the shop archive? Create two rules. Want forum topics but not every reply? Then build one rule with the right content type and filters.
Every rule walks you through five steps:
- Choose a platform (WordPress, WooCommerce, EDD, BuddyPress, bbPress)
- Pick the content type (posts, comments, products, activity, topics, and more)
- Set the placement (inside content, after add to cart, activity meta area, custom theme hook, etc.)
- Add optional filters (show on, hide on, post types, categories, WooCommerce product filters)
- Fine-tune overrides (priority, template, override default display)
That means no template edits, no fragile snippets, and no hunting through theme files at 11pm because your product likes landed in the wrong spot.
Who it’s for (and who can skip it)
If your site uses one consistent layout, stick with the standard WP ULike automatic display. Seriously. Keep it simple.
But if your site mixes any of these, Display Automation saves real time:
- Blog posts and WooCommerce products on the same install
- BuddyPress activity streams alongside standard pages
- bbPress forums where topics and replies need different treatment
- Custom post types, category rules, or page-builder theme hooks
- A theme layout where “top of content” on posts would look wrong on products
For example, picture a store that sells digital downloads and physical products. Likes sit below the add-to-cart button on products, but inside blog tutorials only. That’s exactly the kind of site this tool was built for.
How to build a rule (about 3 minutes)
Step 1: Choose your platform
Start with where your content lives. Display Automation supports:
- WordPress: posts, pages, comments, post previews, custom theme hooks
- WooCommerce: product pages, shop lists, product reviews, custom WC hooks
- Easy Digital Downloads: single download pages and shop/archive listings
- BuddyPress: activity posts and activity comments (including load-more streams)
- bbPress: forum topics with theme hook spots
Also, only platforms you actually have active show up. So you won’t see clutter from plugins you’re not running.
Step 2: Pick the content type
Next, narrow the rule to what people should like:
- Products only, not blog posts
- Forum topics only, not replies
- Activity comments, not the main activity stream
- Pages but not posts, or custom post types alongside standard content
As a result, one rule stays focused instead of putting buttons everywhere on your site.
Step 3: Set the placement
Now choose where the button actually appears. Here are some examples:
- Inside post content, below each comment, or inside post previews on archive pages
- After add to cart, after price, or below each product in shop lists
- In BuddyPress activity meta or content areas
- After bbPress topic titles or topic content
- On any custom theme hook your builder or theme exposes
Because it uses the same WP ULike display engine built in, placements stay light and theme-friendly. Plus, each placement option includes a plain description right in the admin screen, so you’re not guessing what “meta area” means.
Step 4: Add optional filters
Skip this step if you want the button everywhere on that platform. But when you need tighter control:
- Only show on / Hide on: target single posts, product pages, shop archives, BuddyPress profiles, forum pages, and more
- Content types: limit to posts, pages, products, or custom post types
- Categories and tags: show likes only in “News” or only in a specific product category
- WooCommerce filters: on-sale products, featured products, or specific product types
- bbPress filters: limit to specific forums or topic IDs
All of these are optional. Leave them empty and the rule applies broadly. Fill them in when one section of your site needs different behavior.
Step 5: Overrides, priority, and templates
The last step is where Display Automation stops feeling like basic auto-display and starts feeling like a pro tool:
- Override default display: tells a rule to take priority over your global automatic display settings, so you don’t end up with duplicate buttons on the same page
- Rule priority: use the up/down arrows when multiple rules could overlap. Higher priority wins.
- Template picker: choose a different button style per rule when you want products to look different from blog posts
They’re small settings, but a huge help when you’re running five or six rules across a busy site.
Free + Pro work together
Display Automation doesn’t replace WP ULike’s standard automatic display. Instead, it’s the advanced rule layer on top.
The free plugin already handles likes well for most websites. Pro adds the visual rule builder when one global setting isn’t enough. You still get the same engagement system and the same familiar buttons, with smarter placement for sites that outgrew “one size fits all.”
Just getting started? Then use the Add Example Store Rules button to load ready-made (inactive) WooCommerce and EDD rules when those plugins are active. Rename them, tweak the filters, enable, and save.
Supported platforms at a glance
- WordPress: Control likes for posts, pages, comments, and post previews separately.
- WooCommerce: Place buttons on product pages, shop lists, and product reviews without custom templates.
- Easy Digital Downloads: Add voting to single downloads and shop/archive listings.
- BuddyPress: Activity streams, activity comments, and load-more content.
- bbPress: Forum topics with theme-friendly hook spots.
- Custom theme hooks: Drop buttons anywhere your theme or page builder exposes an action hook.
3 quick tips before you build rules
- Start with one rule. Get a clean placement working before you stack multiple conditions.
- Watch for duplicate buttons. If basic automatic display is still on for the same content type, turn it off in Settings or enable “override default” on your rule. The admin panel warns you when both are active.
- Be careful with bbPress “inside content.” On topics, that refers to the opening post of a single topic. Overlapping rules can stack in forums, so test on a staging site first.
More control without more complexity
That’s the sweet spot of WP ULike Display Automation. Visual rules instead of code. Per-platform placements instead of one global guess. Optional filters when you need them, ignored when you don’t.
Your visitors still see the same like buttons. You just stop fighting your layout to get them in the right place.
Already on WP ULike Pro? Head to Tools → Display Automation and create your first rule. Most setups take a few minutes.
Not on Pro yet? Explore WP ULike Pro, read the documentation, or start with the free plugin on WordPress.org.
Frequently asked questions
What is WP ULike Display Automation?
Display Automation is a Pro feature in WP ULike Pro → Tools that lets you create visual rules for where like buttons appear. You choose the platform, content type, placement, and optional filters without editing theme files.
Do I need Display Automation if automatic display already works?
Not always. If one global placement works across your whole site, the standard automatic display is enough. Display Automation is for mixed layouts: blogs plus shops, communities plus forums, custom hooks, or different button styles per content type.
Can I use custom theme hooks?
Yes. Choose “Custom Theme Hook” (or the platform-specific custom hook option) and enter any WordPress action hook your theme or page builder provides. It’s useful for Elementor, custom templates, or theme-specific spots.
Why am I seeing duplicate like buttons?
Usually because both basic automatic display and a Display Automation rule are active for the same content type. Turn off automatic display under Settings → Configuration → Content Types for that type, or enable “override default display” on your rule. The Display Automation screen also shows a warning when basic auto display is still enabled.
Where do I find Display Automation in WordPress?
Go to WP ULike Pro → Tools → Display Automation in your WordPress admin. You need an active Pro license to save rules.
Does Display Automation work with WooCommerce and BuddyPress?
Yes. When WooCommerce, Easy Digital Downloads, BuddyPress, or bbPress is active, those platforms appear in the rule builder with their own placement options and filters. You can also load example store rules as a starting point.
Leave a Reply